How to download MSME Certificate online?

MSME

Table of Contents

What is MSME?

The Government of India has to focus on the growth of the industrial sector with the Made in India campaign. The development of a thing begins with its foundation. For the industrial sector, it is the MSMEs that are the backbone of a developing economy. To support these MSMEs, the Government launched so many schemes, subsidies, and even the MSMED Act of 2006, which will boost this sector in the upcoming future.

MSME is the acronym for Micro, Small and Medium Enterprises that are defined as-

What are MSME certificates?

To avail of the benefits under the MSMED Act, an enterprise must have a valid MSME registration and certificate. These benefits include easy sanction of bank loans, lower rates of interest, exemption under Direct Tax Laws, excise exemption scheme and get support under the reservation and Interest on Delayed Payments Act.

According to the MSMED Act of 2006, MSME certificates are necessary to avail benefits from the State and Central Government. One has to register on the MSME portal to get a certificate. The validity of this certificate is lifetime till the enterprise is operational. But if someone has applied for a provisional certificate, it will be valid for up to five years only.

How to register an MSME?

Step 1:- Visit the Udhyam registration portal here https://udyamregistration.gov.in/Government-India/Ministry-MSME-registration.htm.

Step 2:- Choose the first option if you have to make a new application. Choose the second option if you already have the UAM number.

Step 3:- Enter your details as asked on the screen and validate.

Step 4:- After the successful submission, your registration number flashes on the screen with a thank you message. Keep this registration number safe for future purposes.

Step 5:- Wait for 3-4 days till your application gets processed. Once done, you will receive your MSME certificate to the registered email. If not received, download the certificate as mentioned below.

How to register for the MSME certificate?

Step 1:- Visit the MSME certificate registration website https://msmeregistration.gov.in

Step 2:- Fill in all the details asked in the form and pay online.

Step 3:- In 1-2 days, the MSME certificate will come to the registered email ID. Download the certificate.

How to download an MSME certificate?

Download MSME certificate with UAM number-

MSME Certificate

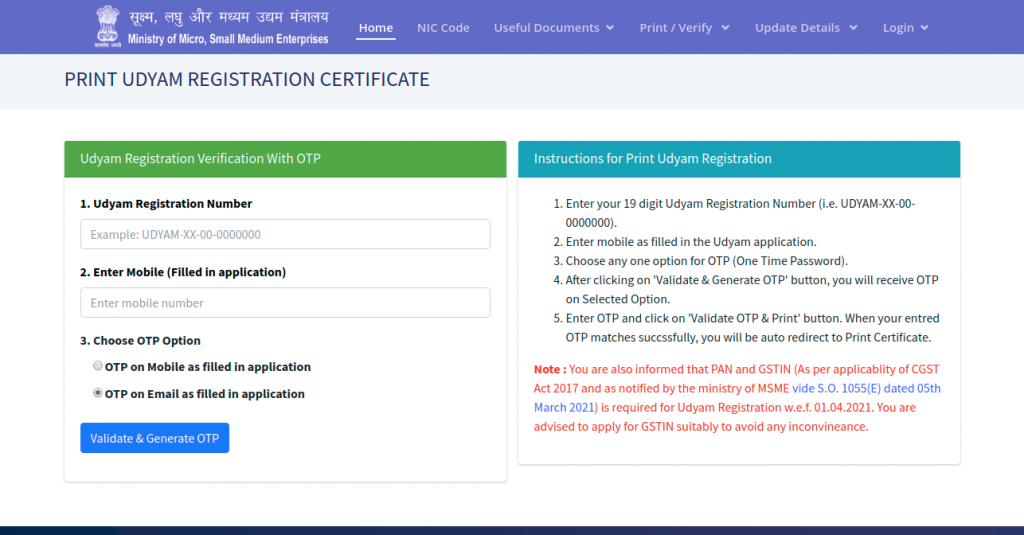
Step 1:- Visit this website https://udyamregistration.gov.in/PrintUdyamCertificate.aspx.

Step 2:- Fill in your 12-digit Udhyam Registration Number (UAM).

Step 3:- Choose the OTP generation option. Click on validate and generate OTP.

Step 4:- Enter the OTP. Click on validate OTP and Print. After a successful attempt, your MSME will start to download.

Download without UAM number-

Method 1-

Step 1:- Visit the Udhyam website here https://msmeregistration.gov.in

Step 2:- Fill up the details that you previously entered while registering for the MSME certificate.

Step 3:- Once you click on submit the application tab, the system will tell you that there is already an enterprise registered with the details.

Step 4:- After a warning, it will redirect to the page where you will find their UAM number.

Step 5:- Copy the UAM number and proceed with the downloading of the certificate.

How to report any grievances regarding MSME?

Step 1:- Visit the Champions website that comes under the MSME portal https://champions.gov.in/Government-India/Ministry-MSME-Portal-handholding/msme-problem-complaint-welcome.htm.

Step 2:- One the top left corner, click on Your Grievances.

Step 3:- Choose to register your grievance if you want to make a new grievance https://champions.gov.in/MSME-Ministry/micro-small-Medium-industry/issues_and_problems_enterprise/Register_complaint_grievance.htm.
Fill in all the details correctly after you get an OTP for validation.

Choose to make a suggestion/seek guidance if one wants to make a suggestion or seeks guidance regarding MSME https://champions.gov.in/Ministry-of-MSME/manufacturing_service_sector/make_Suggestion/Seek_guidance.htm.
Fill in all the details correctly and wait for the reply to come at your registered mail or mobile number.

Where to find the helpline numbers?

One can find the helpline numbers on the official website https://msme.gov.in/contactus. One can call 011-23063800 for registration and certificate queries and 011-23062354 for any technical support.

File a complaint

How to raise a grievance in EPFiGMS New PF Grievance Portal?

EPFiGMS

Table of Contents

  • What is EPFiGMS?
  • What complaints are registered?
  • How to file a complaint in the portal?
  • How to check the status of your complaint?
  • Things to keep in mind
  • How to send a reminder to the EPF Grievance?
  • Frequently Asked Questions

What is EPFiGMS?

EPFiGMS or Employees Provident Fund Grievance Management System is an official online platform where registered EPF members access the portal and file their complaints, queries and grievances. The issues related to the employee’s provident fund, such as the contribution of the provident fund, withdrawal or transfer, are processed through this system.

Many workers, having problems like failed transfer of one’s EPF balance when they change their jobs, or their request of transfer is unfulfilled, have to complain about the issue on this portal. This portal tracks maturity proceeds, loans and withdrawals, along with the issue-solving characteristics.

What complaints are registered?

  1. Misplaced or returned cheque
  2. Last settlement of pension
  3. Clearance of insurance benefit
  4. Withdrawal of EPF
  5. Final settlement of EPF
  6. Issue of PF slip/PF balance
  7. Transfer of PF account
  8. Scheme Certificate

How to file a complaint in the portal?

  1. Visit the official website of EPF Grievance Management System https://epfigms.gov.in/.
  2. Press the “Register Grievance” option.
  3. Select your status from the following:
    • PF Member
    • EPS Pensioner
    • Employer
    • Others
  4. Select ‘Others’ if you don’t have a PF number.
  5. Fill in your Universal Account Number (UAN) and the security code (captcha).
  6. Press ‘Get details.’
  7. Details, like your name, UAN, email ID, and mobile number, flash on the screen.
  8. You receive an OTP when you click on the ‘Get OTP’ option to move forward.
  9. Choose the PF account under the personal details section.
  10. After doing this, select the type of EPF grievance and its category and description.
  11. Upload the documents required by clicking on the ‘Choose File and the Attach’.

Note:- The registered complaint number gets delivered to your mobile number and email ID. It may take up to 15-30 days for your complaint to get resolved.

How to check the status of your complaint?

  • Visit the official portal https://epfigms.gov.in/.
  • Press the ‘View Status’ option.
  • Enter the registration number that one gets at the time of making their first complaint.
  • If the complaint was made on the previous version of the website, one has to insert the grievance password and mobile number/email ID to enter the view status section.
  • Enter the security code shown on the screen.
  • Click on ‘Submit’.
  • The current status of the complaint displays on the screen.

Things to keep in mind

  1. The complaint registration number needs to be kept safe for future use.
  2. This code comes in handy to search your complaint through the portal. Other than this code, your name and city is also an option for the search.
  3. EPFiGMS portal allows its members to check their provident fund account balance status.

How to send a reminder to the EPF Grievance?

  • Visit the official portal https://epfigms.gov.in/.
  • Press the ‘Send Reminder option.
  • Enter your registration number.
  • Insert the grievance password and mobile number/email ID to enter the view status section.
  • Enter the security code shown on the screen.
  • Click on ‘Submit’.
  • After clicking the submit button, a reminder related to your EPF grievance gets delivered to the concerned department.

Frequently Asked Questions

How can I contact their customer care?

You can call their customer care centre to either file a complaint or ask the status of your complaint or resolve any queries at 1800 118 005.

How do I receive the registered complaint number?

The registered complaint number gets delivered to your mobile number and email ID. The registration number has to be kept safe for future use.

How many days does it take to resolve the complaint?

It takes up to 15-30 days to solve a complaint. The count starts from that day when the first application got registered, until that day, the PF amount gets transferred to the bank account online.

How are EPF grievances handled?

Giving solutions to tons of grievances is an important role that EPFO operates. The complaints are monitored on a regular basis. A very strict timeline is provided to the organization for solving the grievances, so they try to resolve the complaint as quickly as possible.

Can I file a EPF complaint through social media?

Yes, EPFO members can raise a complaint via social media. Their respective social media handles are:
Twitter – https://twitter.com/socialepfo
Facebook – https://www.facebook.com/socialepfo

Are dormant EPF accounts traceable?

The EPFO helpdesk can help you to trace the dormant EPF accounts. The EPFO member has to complete their registration process and provide the correct details of the account to make the tracking process easier both for the organization and for the account holder.

This was all about how you can raise an EPF grievance in EPFiGMS Portal. However, if you are facing issues with defective product or service which you purchased and vendor is not resolving, you can file a consumer complaint at https://voxya.com/file-consumer-complaint
Our experienced legal team will help you to get refund, replacement and compensation.

Consumer Complaint

How to apply for a Police Verification Certificate online in Karnataka using Seva Sindhu Portal?

seva sindhu portal

Table of Contents

What is Seva Sindhu Portal?

The government of Karnataka started an initiative in 2017 to deliver doorstep Government services to its citizens. The Government combined various delivery channels and service centres, like Common Service Centres, Karnataka One, Atalji Jana Snehi Kendra, Bapuji Kendras and Bangalore One, which aimed to bring all these services on a single platform.

The ultimate goal of Seva Sindhu is to provide paperless, faceless and cashless services. With time, it is becoming one of the hassle-free services in the state by reducing the turnaround time and opportunity cost.

Since the police stations in Karnataka shut down due to COVID-19, people were scared and unable to get the Police Clearance Certificate (PCC) or other services. Due to this, the Government of Karnataka came up with a solution to launch eight types of police verifications via the Seva Sindhu Portal. Now, there is no need to go to the police station to get a certificate.

These eight services are:

  1. Police verification certificate (PVC) for various institutions or companies.
  2. Police approved antecedent verification certificates for marriages.
  3. PVC for any training or apprenticeship in any Public Sector Undertakings (PSUs) or for trainees/workers that work daily in Government Institutions.
  4. PVC for individuals that will work as a coolie/loader/ Class IV security staff/ supervisor at the airport.
  5. PVC (antecedent verification) for Central/State Government employees
  6. PVC for household workers such as maids, gardeners, etc.
  7. Service verification
  8. PVC for going abroad for studies or immigration (study VISA, and not tourist VISA)

How to get a PCC/PVC from Seva Sindhu Portal?

Step 1:- One must visit the main Seva Sindhu Portal at https://sevasindhu.karnataka.gov.in/Sevasindhu/English to initiate the application. The above link is for the English page; one can use the Kannada page for the same.

Step 2:- Click on the blue button of the Department and Services tab in the menu bar.

Step 3:- The list of all departments is visible until page number 6.

Step 4:- Choose page number 4. Click on the fourth option in the centre row- Karnataka State Police. All the options under this tab are now visible.

Step 5:- Now, choose the type of certificate you are looking after.

Step 6:- One can see all the details displayed on the screen like eligibility details, documents required, application fee, delivery time, the procedure for applying, etc. Click on Apply Online.

Step 7:- You are redirected to the login page, where you have to create an account on the portal using your Aadhaar card from the DigiLocker service.

Step 8:- After creating the account, log in to the portal using your login ID and password. An OTP is generated on your registered mobile number for validation.

Step 9:- Insert all the required details and documents on all the pages carefully.

Step 10:- Once inserted, check the details thoroughly and click on submit.

Step 11:- After internal verification, your registered mail ID receives a digitally signed certificate, and your registered mobile number also notifies you for the same.

What is the difference between PCC and PVC?

The Police Clearance Certificate is an essential official document required by the people residing in India or Indians, who come from foreign lands, to identify their criminal records, if any, they might have against their names. The Indian Police or an authorised Indian Government organisation issues the PCC.

PCC is provided only after police verification. The police have to verify the applicant’s residential status, VISA or immigration status and employment status to provide a valid certificate for which the applicant has applied. The key parameters that the police verifies manually are the criminal records and address of the applicant.

What are the documents required to apply for PCC?

Many applicants wish to go to Emigration Check Required (ECR) countries for employment purposes. ECR countries include the United Arab Emirates, Afghanistan, Oman, Yemen, Kingdom of Saudi Arabia, Indonesia, Sudan, Qatar, Kuwait, Syria, Bahrain, Thailand, Malaysia, Lebanon, Iraq, Libya, and Jordan. They need to submit these documents to obtain PCC:

  • Old passport in original and self-attested two photocopies
  • Present proof of address
  • Self-attested copy of employment contract with the foreign employer
  • Copy of valid VISA

The applicants, who are emigrating to non-ECR countries, have to submit the following documents:

  • Old passport in original with self-attested photocopies
  • Proof of address
  • Proof of residential status, employment contract, or long term VISA for immigration.

Family members, who are dependent on other family members for residing/emigrating in/to both ECR and non-ECR countries, need to submit the following documents:

  • Old passport in original with self-attested two photocopies
  • Proof of address
  • Sponsorship declaration by the person who is sponsoring the emigration of the PCC applicant.

What if I am questioned regarding PCC by the foreign authorities?

The applicant must have a PCC for submitting it to the Foreign Local Government. Generally, PCC is valid from 6 months to a year, but one can check the status by visiting their state’s official police website or the passport website. The registered mobile number gets regular updates. So, one has to track the notifications.

How much time does it take to receive the PCC? How can I track the status?

It takes around 2-3 weeks to get the PCC. One can track the status using the Application Reference Number on the main webpage of Seva Sindhu Portal or the updates provided regularly via SMS and email.

What are the modes of payment?

One can pay online using a debit/credit card or net banking, or offline through challan. The offline mode takes time to update the status, while the online portal updates the status instantaneously if the payment is successful.

Seva Sindhu Portal is not working. Can I apply for the PCC/PVC from another website?

One can apply for the PCC using the Karnataka One web portal. Visit the official webpage here: https://www.karnatakaone.gov.in/Info/Public/PoliceVerification and sign in. Follow the steps as indicated on the webpage for getting the PCC.

If this website is also down, one should contact the centre of Seva Sindhu Portal at 8088304855 / 6361799796 / 9380204364 or 9380206704 from 9 a.m. to 6 p.m. (remains closed on public holidays), or mail them at sevasindhu@karnataka.gov.in.

File a complaint

If you are a consumer and looking for a replacement, refund and compensation from the company or the seller then File a complaint at Voxya an online consumer complaints forum that helps consumers to get justice and resolve consumer complaints with an optimal solution.

How to use the Instamojo payment gateway and how to resolve an Instamojo complaint online?

instamojo

Table of Contents

What is the Instamojo payment gateway?

After one plans to start a business, another thought comes about which payment gateway to use for seamless payments. India has plenty of payment gateways, but the most recent one that is coming to the news because of its rapid growth and partnerships with many banks and fintech is the Instamojo payment gateway.

Instamojo payment gateway came into effect in 2012. It has become one of the finest leading payment gateways in India within a short time. With its headquarters located in the Silicon Valley of India, Instamojo covers over 800,000 businesses from all across our motherland with more than 10 million happy customers. Who knew a provider of payment links would become a full-payment gateway within a flash.

instamojo payment

How to use the Instamojo payment gateway?

i) If you are a buyer

If you are a buyer and want to purchase something by paying via Instamojo, you have to follow just three simple steps:

Sign up on the Instamojo gateway here: https://www.instamojo.com/payment-gateway/.
Choose the online payment.
The customer has to choose one of the payment options from the given list and complete the payment.

ii) If you are a seller

One can merge the Instamojo payment gateway with their business website. Follow these simple Application Programme Interface here https://docs.instamojo.com/docs/payments-api to communicate with the payment gateway. When the setup is complete, you can receive the payment in these simple steps:

Create a payment request
Show the payment link to the buyer
Get your payment credited to your bank account in three days.

But one wonders how to create the payment links that you can show to the buyer. Well, here is how you can do it!

Step 1:- Login with the Facebook or Google account on the main website https://www.instamojo.com/payment-links?utm_source=imblog&utm_medium=interlink&utm_campaign=payment_links.

Step 2:- Click on the “Create Payment Link” option on the dashboard.

Step 3:- Choose either of the two options: Quick Links or Smart Links.

Quick Links:- These types of links are shared instantaneously via many channels. Only collecting the price is the main aim for creating this type of link.

Smart Links:- If a person wants to maintain the documents of every customer for future reference, he can use this type of link to gather additional information.

Step 4:- Make customisations in the Smart Link as per your need.

Step 5:- After the link gets generated, you can share the link via various platforms like WhatsApp, QR code, etc., to collect the amount.

Step 6:- One can track life and expired links from the dashboard.

Unified Payments Interface is the most common and quickest way to collect payment. Follow these steps to collect the payment via UPI:
Choose UPI as the preferred mode of payment.
Choose the appropriate UPI app from which you want to receive the amount.
The buyer chooses the option of remittance, and it gets successful.

People can choose the correct UPI ID of the supplier from the Auto-Suggest feature. With this, there are fewer chances of paying the wrong supplier.

Collect the payment using Instamojo Online Store

Customers can go to the link https://www.instamojo.com/online-store/ to create an online store through the Instamojo payment gateway. The buyer needs to add the product to the cart, and they are ready for payment immediately. As simple as that!

Collect via NEFT

Instamojo NEFT does not track, manage or reconcile your payments. That’s where it steps ahead of the regular NEFT. One has to create a Virtual Account Number (VAN) for receiving the remittances. This number is helpful to track and reconcile the payments. Create a VAN, share the VAN details with the buyer, he makes the payment, and you receive your payment.

One has to follow the link https://www.instamojo.com/blog/launching-instamojo-neft-direct-bank-transfer/ compulsorily, to understand how to create a VAN and other information regarding NEFT and direct transfer.

What charges does the Instamojo payment gateway take?

Prices change from time to time depending upon several rates offered by the bank and Government both. One can check here https://www.instamojo.com/pricing#tabs|1 regarding the current charges of the Instamojo payment gateway.

Can I take international payment via Instamojo?

Instamojo accepts international cards but processes them to Indian rupees. Instamojo does not support other currencies, which means the foreign customers have to pay with their cards at the exchange rate provided by the bank. In short, the overall transaction profit is less in the case of international payments.

What are the common reasons for failure while making a payment?

Authentication issues- The customer may have filled in the wrong details, like CVV, card number, expiry date, etc., while making the payment. You can ask them to retry with the correct information.
Authorisation issues- This occurs when the customer does not have a sufficient bank balance, his card has reached the limits of the transaction, or the bank declined the transaction due to some internal errors. You can ask the customer to pay using an alternate method.

What if the money gets deducted from the customer’s account, but I did not receive it?

One has to wait at least 24 hours to let the bank and Instamojo clear the settlement issues. One has to mail immediately at support@instamojo.com to check the status of the payment.

If no confirmation updates come from either of the parties, there are chances that the buyer already received the money back. If it is still not received, then wait for 10-12 working days to reflect the amount from the bank’s side.

Why does one have to wait for 24 hours?

Instamojo does reconciliation with the banks three times on a working day. Reconciliation changes the status of transactions to success in case the money gets deducted.

Hence, in case of successful payment, the maximum time taken by the Instamojo to notify is 24 hours. In case you have not received the confirmation, then the transaction has failed. There can be some exceptional cases where it takes the bank more than 24 hours to send the status. Such cases are rare.

One can submit a request here https://support.instamojo.com/hc/en-us if there are still any issues while using the Instamojo payment gateway.

file-consumer-complaint-india-7

If you tried your efforts but didn’t get a solution from Instamojo then you can file a complaint against Instamojo at Voxya an online consumer complaint forum to resolve your complaints with an optimal solution.